PlantUML
One of my go-to tools
PlantUML is a DSL for creating UML diagrams quickly. UML is commonly used for software systems, but is not limited to that scope. With the same ease it can be used to present all kinds of ideas and data. It takes just a few lines of source to produce high quality diagrams. The two main views of a system that we can model are structural information or behavioral information. From these views, there are numerous kinds of diagrams, with many that PlantUML makes available. There are a few that are most useful and below are some examples of my favorites:
| UML type | Diagram type | PlantUML | Examples |
|---|---|---|---|
| Structural | Class diagram | ✓ | ✓ |
| Component diagram | ✓ | ||
| Composite structure diagram | |||
| Deployment diagram | ✓ | ||
| Object diagram | ✓ | ||
| Package diagram | |||
| Profile diagram | |||
| Behavioral | Activity diagram | ✓ | ✓ |
| Communication diagram | |||
| Interaction overview diagram | |||
| Sequence diagram | ✓ | ✓ | |
| State diagram | ✓ | ✓ | |
| Timing diagram | ✓ | ||
| Use case diagram | ✓ |
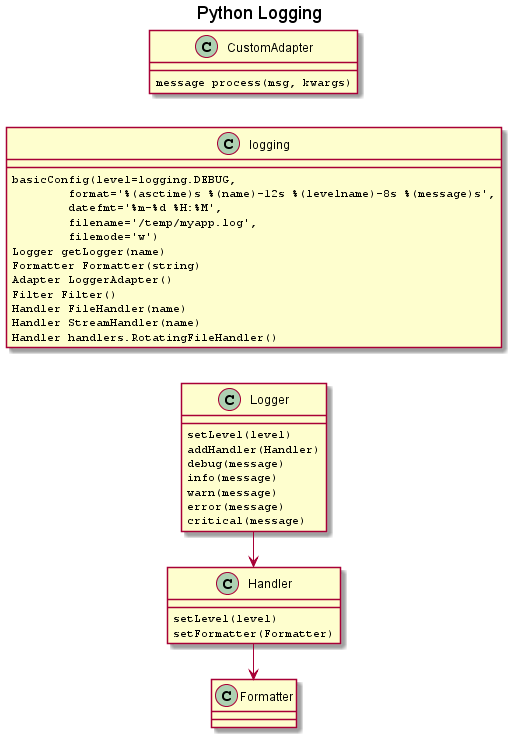
Class diagram
This one I did when I wanted to use a Python logging facility. The terminology quickly got confusing (What’s the difference between the logging class and the Logger class? Why do you need a Handler?) I outlined just the classes and the methods of interest at the time. It’s not a complete description, but doesn’t need to be for someone who just wants to quickly drop the libary into their codebase. As documentation, it would be time consuming to sync the diagram with the original library code changes and PlantUML is not the tool for that.
skinparam ClassAttributeFontName Courier
left to right direction
title Python Logging
class logging {
  basicConfig(level=logging.DEBUG,\n
    \tformat='%(asctime)s %(name)-12s %(levelname)-8s %(message)s',\n
    \tdatefmt='%m-%d %H:%M',\n
    \tfilename='/temp/myapp.log',\n
    \tfilemode='w')
  Logger getLogger(name)
  Formatter Formatter(string)
  Adapter LoggerAdapter()
  Filter Filter()
  Handler FileHandler(name)
  Handler StreamHandler(name)
  Handler handlers.RotatingFileHandler()
}
class Logger {
  setLevel(level)
  addHandler(Handler)
  debug(message)
  info(message)
  warn(message)
  error(message)
  critical(message)
}
class Handler {
  setLevel(level)
  setFormatter(Formatter)
}
class Formatter {
}
class CustomAdapter {
  message process(msg, kwargs)
}
Handler->Formatter
Logger->Handler
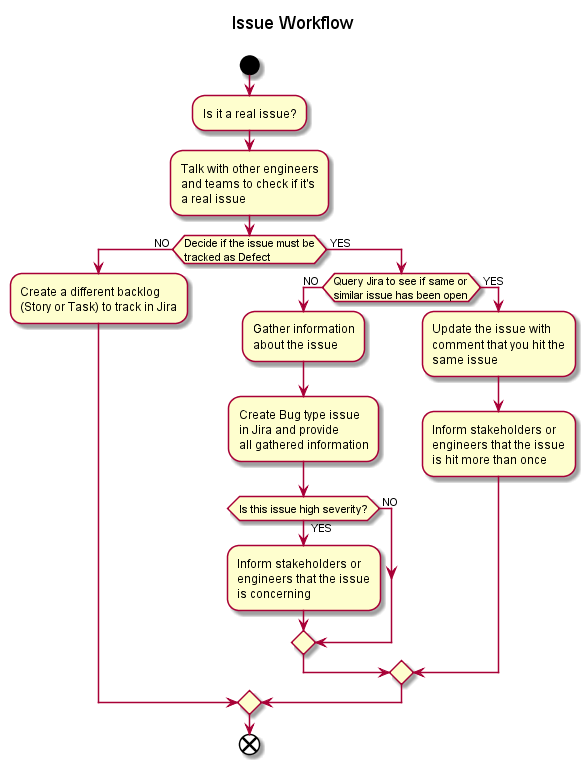
Activity diagram
This example doesn’t describe software at all; it describes a process used in software development. It may or may not be exactly how a given group handles issues (bugs). But a diagram like this can be used by an organization to communicate a current process, a proposed process, a change in process- hopefully it comes across that a good picture is just a starting point. It can be easily produced and changed.
Title Issue Workflow\n
start
:Is it a real issue?;
:Talk with other engineers\nand teams to check if it's\na real issue;
if (Decide if the issue must be\ntracked as Defect) then ( NO )
 :Create a different backlog\n(Story or Task) to track in Jira;
else ( YES )
 if (Query Jira to see if same or\nsimilar issue has been open) then ( NO )
  :Gather information\nabout the issue;
  :Create Bug type issue\nin Jira and provide\nall gathered information;
  if (Is this issue high severity?) then ( YES )
    :Inform stakeholders or\nengineers that the issue\nis concerning;
   else ( NO )
   endif
 else ( YES )
  :Update the issue with\ncomment that you hit the\nsame issue;
  :Inform stakeholders or\nengineers that the issue\nis hit more than once;
 endif
endif
end
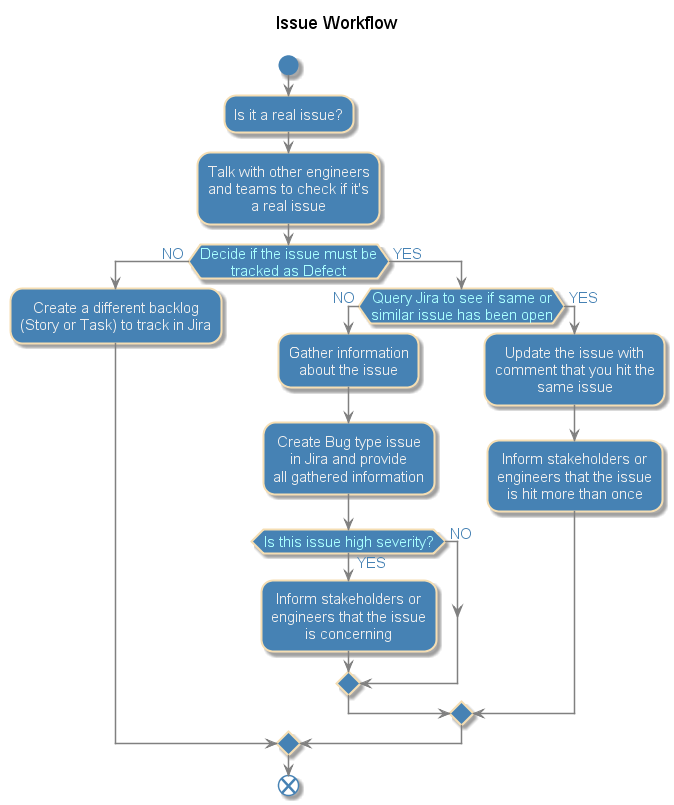
Now add some formatting to change from the default settings- by adding lines at the top of the diagram source. This example shows a number of features: X11 color names (e.g. steelblue), hex colors (e.g. #aaffff), function (macro) define and substitution (e.g. MYFONT or MYBORDER). It uses these features in a skinparam spec which can allow for very specific customization.
!MYFONT = "Arial"
!MYBORDER = 2
skinparam defaultTextAlignment center
!MY0 = "#eeeeee"
!MY1 = "steelblue"
!MY2 = "#aaffff"
!MY3 = "wheat"
skinparam activity {
  BackgroundColor         MY1
  BorderColor             MY3
  BorderThickness         MYBORDER
  DiamondBackgroundColor  MY1
  DiamondBorderColor      MY3
  DiamondFontColor        MY2
  DiamondFontName         MYFONT
  DiamondFontSize         15
  DiamondBorderThickness  MYBORDER
  FontColor               MY0
  FontName                MYFONT
  FontSize                15
  ArrowColor              gray
  ArrowFontColor          MY1
  ArrowFontName           MYFONT
  ArrowFontSize           15
  StartColor              MY1
  EndColor                MY1
}
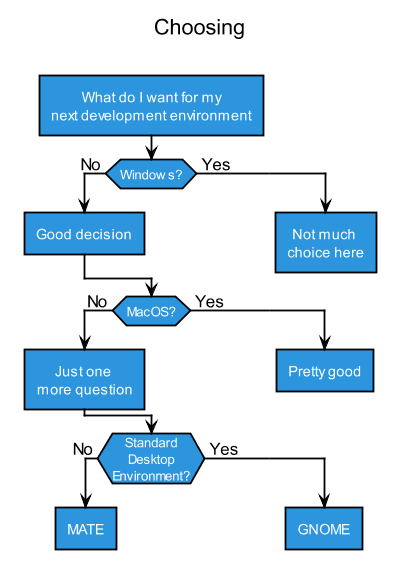
Another activity diagram came from a real algorithm. It is a re-creation in PlantUML of someone’s decision diagram, including formatting and color. It makes use of a complex multiline function, so the resulting effort once the function has been debugged is to define some strings and call the function three times. It could easily be extended to create more complicated logic. Unfortunately, because the algorithm this is based on is proprietary code, this version just uses some generic strings.
scale 1.2
skinparam shadowing false
skinparam defaultTextAlignment center
!MYCOLOR       = "#2c95dd"
!MYFONTCOLOR   = "white"
!MYBORDERCOLOR = "black"
skinparam activity {
  Fontcolor               MYFONTCOLOR
  BackgroundColor         MYCOLOR
  BorderColor             MYBORDERCOLOR
  ArrowColor              MYBORDERCOLOR
  ArrowFontColor          MYBORDERCOLOR
  ArrowFontSize           14
  DiamondFontColor        MYFONTCOLOR
  DiamondBackgroundColor  MYCOLOR
  DiamondBorderColor      MYBORDERCOLOR
}
skinparam swimlane {
  BorderThickness  0
  BorderColor      white
  TitleFontColor   hidden
}
!unquoted function DECIDE(a,b,c)
if (a) then ( No )
  :b]
else ( Yes )
  |2|
  :c]
  detach
endif
|1|
!endfunction

!a0 = "What do I want for my\nnext development environment"
!a1 = "Windows?"
!a2 = "Good decision"
!a3 = "Not much \nchoice here"
!b1 = "MacOS?"
!b2 = "Just one \nmore question"
!b3 = "Pretty good"
!c1 = "Standard\nDesktop\nEnvironment?"
!c2 = "MATE"
!c3 = "GNOME"

title Choosing
|1|
:a0]
DECIDE(a1,a2,a3)
DECIDE(b1,b2,b3)
DECIDE(c1,c2,c3)
detach
Sequence diagram
Sequence diagrams are one of the best ways to describe processes and software behavior with precision. The process of creating a diagram like this helps to show where there is ambiguity or error. For both existing systems and those undergoing design, it captures visually the interactions between participants that might not be clear (How does information get from here to there? Are all actors accounted for?). A small spec results in a very nice diagram.
title Authorization Flow
actor u as "User"
participant c as "Client\n"
participant a as "Auth\nServer"
participant s as "Resource\nServer"
u -> c  : Request
c -> a  : Redirect to Auth
u <-- a : Request for login / approval
u -> a  : User authenticates / approves
c <-- a : Authorization code
c -> a  : Authorization code + Client ID + Client Secret
a -> a  : Validate
c <-- a : ID Token + Access Token
c -> s  : GET /v2/Resource + Access Token
c <-- s : Resource
u <-- c : Results
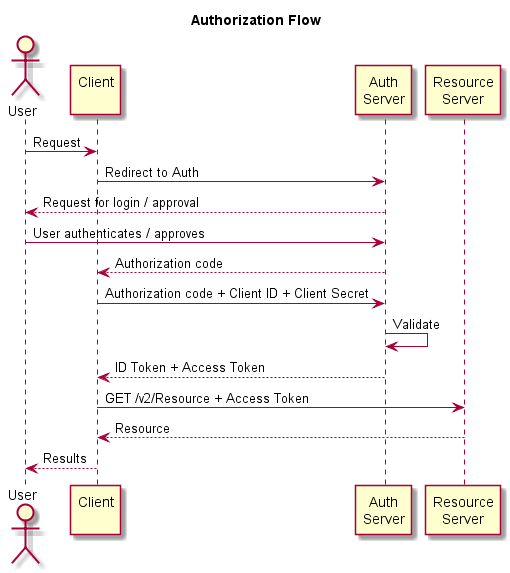 This is how a diagram was brought to me- I liked the formatting so I duplicated it in PlantUML.
hide footbox
skinparam roundcorner 10
skinparam shadowing false
skinparam sequence {
  LifeLineBorderColor         gray
  ParticipantBackgroundColor  ivory
  ParticipantBorderColor      gray
  ActorBorderColor            gray
  ActorBackgroundColor        ivory
  ArrowColor                  #555
  ArrowFontColor              #555
}
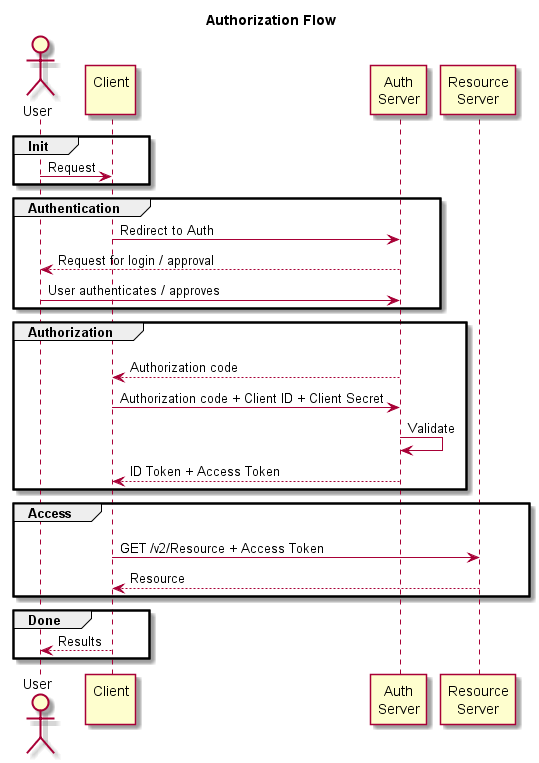
 It’s easy to provide more information with some grouping.
title Authorization Flow
actor u as "User"
participant c as "Client\n"
participant a as "Auth\nServer"
participant s as "Resource\nServer"
group Init
u -> c  : Request
end
group Authentication
c -> a  : Redirect to Auth
u <-- a : Request for login / approval
u -> a  : User authenticates / approves
end
group Authorization
u -[hidden]-> c
c <-- a : Authorization code
c -> a  : Authorization code + Client ID + Client Secret
a -> a  : Validate
c <-- a : ID Token + Access Token
end
group Access
u -[hidden]-> c
c -> s  : GET /v2/Resource + Access Token
c <-- s : Resource
end
group Done
u <-- c : Results
end
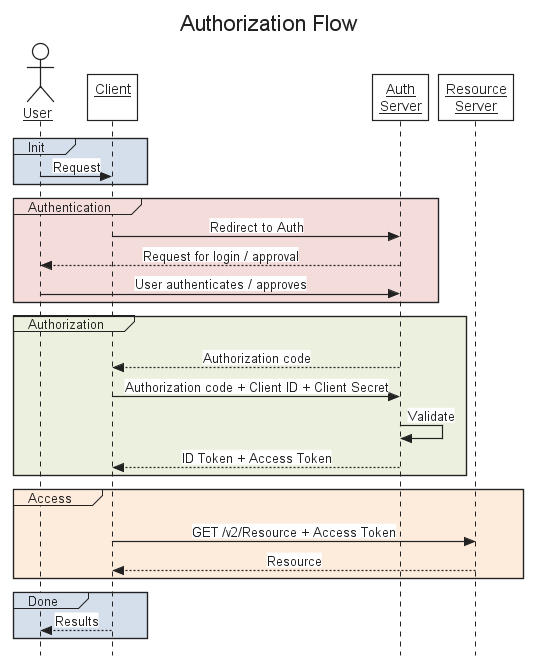
 Here I duplicate a diagram created with who knows what tool. It had some unusual formatting and other attributes. With functions and additional customization, it looks pretty close to the original. Better? Worse? Different.
hide footbox
skinparam shadowing false
skinparam style strictuml
!MYFONT     = "Arial"
!MYCOLOR    = "#222"
!MYLINES    = "1.2"
!MYSTYLE    = "normal"
!$GROUP_A1  = "#d5dfec"
!$GROUP_A2  = "#f3dcda"
!$GROUP_A3  = "#ebf1de"
!$GROUP_A4  = "#fdebdc"
!HIDDEN     = "hidden"
!unquoted function PART($x)       return "<u>" + $x + "</u>"
!unquoted function ARROWLABEL($a) return "<color:"+MYCOLOR+"><back:white>"+$a
!unquoted function GRP($a, $b)    return "group" + $a + " "+ $a + " " + $b
skinparam sequence {
  TitleFontSize               22
  TitleFontStyle              MYSTYLE
  TitleFontColor              MYCOLOR
  TitleFontName               MYFONT
  LifelineBorderColor         MYCOLOR
  ActorBorderColor            MYCOLOR
  ActorBackgroundColor        white
  ActorBorderThickness        MYLINES
  ActorFontColor              MYCOLOR
  ParticipantFontColor        MYCOLOR
  ParticipantFontStyle        MYSTYLE
  ParticipantFontName         MYFONT
  ParticipantBorderColor      MYCOLOR
  ParticipantBackgroundColor  white
  ParticipantBorderThickness  MYLINES
  ArrowFontColor              MYCOLOR
  ArrowFontStyle              MYSTYLE
  ArrowFontName               MYFONT
  ArrowColor                  MYCOLOR
  ArrowThickness              MYLINES
  GroupBorderColor            MYCOLOR
  GroupBorderthickness        MYLINES
  GroupHeaderFontStyle        MYSTYLE
  GroupHeaderFontColor        MYCOLOR
  GroupHeaderFontName         MYFONT
  MessageAlign                center
}

title Authorization Flow

actor u as "PART(User)"
participant c as "PART(Client)\n"
participant a as "PART(Auth)\nPART(Server)"
participant s as "PART(Resource)\nPART(Server)"

GRP($GROUP_A1, Init)
u -> c  : ARROWLABEL(Request)
end

GRP($GROUP_A2, Authentication)
c -> a  : ARROWLABEL(Redirect to Auth)
u <-- a : ARROWLABEL(Request for login / approval)
u -> a  : ARROWLABEL(User authenticates / approves)
end

GRP($GROUP_A3, Authorization)
u -[HIDDEN]-> c
c <-- a : ARROWLABEL(Authorization code)
c -> a  : ARROWLABEL(Authorization code + Client ID + Client Secret)
a -> a  : ARROWLABEL(Validate)
c <-- a : ARROWLABEL(ID Token + Access Token)
end

GRP($GROUP_A4, Access)
u -[HIDDEN]-> c
c -> s  : ARROWLABEL(GET /v2/Resource + Access Token)
c <-- s : ARROWLABEL(Resource)
end

GRP($GROUP_A1, Done)
u <-- c : ARROWLABEL(Results)
end
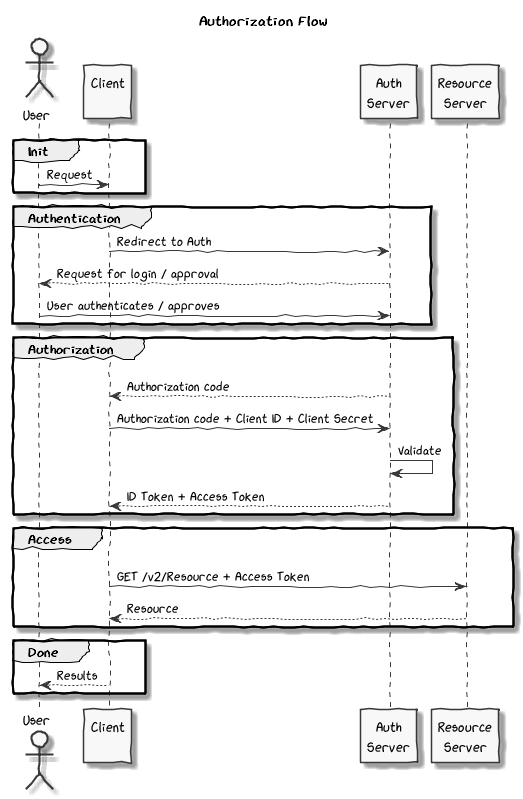
 For fans of xkcd, you can generate that style with no trouble and a few lines (after the font has been installed).
skinparam handwritten true
skinparam monochrome true
skinparam defaultfontname xkcd script
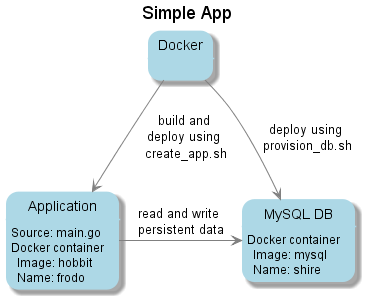
State Diagram
I rarely use this for actual state modeling. However, for showing relationships and capturing relevant information, nothing beats it.
skinparam state {
  BackgroundColor    lightblue
  BorderColor        lightblue
  Arrowcolor         gray
}
Title Simple App
state d as "Docker"
state app as "Application" : Source: main.go\nDocker container\n  Image: hobbit\n  Name: frodo
state db as "MySQL DB" : Docker container\n  Image: mysql\n  Name: shire
d --> app : build and \ndeploy using \ncreate_app.sh
d --> db : deploy using \nprovision_db.sh
app -r-> db : read and write \npersistent data
References
Online Demo Server (try PlantUML without installing a thing)
http://www.plantuml.com/plantuml/uml/
Getting PlantUML
http://plantuml.com/running
Graphviz
https://www.graphviz.org/
Skinparam colors and parameters
http://plantuml.com/skinparam
Default skinparam colors and parameters
https://github.com/plantuml/plantuml/blob/master/skin/plantuml.skin
Skinparam in ReadTheDocs format
https://plantuml-documentation.readthedocs.io/en/latest/formatting/all-skin-params.html
Built in icons
https://mrhaki.blogspot.com/2017/10/plantuml-pleasantness-using-built-in.html
Forum for Q&A and to request enhancements
https://forum.plantuml.net/